PicPressor is a modern and user-friendly desktop application designed to optimize your image file sizes using advanced image compression algorithms. It offers high-quality compression for JPEG and PNG formats, with additional options for resizing images and leveraging external compression tools (OptiPNG/jpegtran) for even better results.
Features
- Multi-Image Support: Compress single or multiple image files simultaneously.
- JPEG Compression: Optimize JPEG files with adjustable quality levels.
- PNG Compression: Optimize PNG files with adjustable compression levels.
- Image Resizing: Resize images during the compression process.
- Advanced Compression (OptiPNG/jpegtran): Option to integrate external tools for even better compression.
- Live Preview: See an instant preview of the compressed image for single files as you adjust settings.
- Process Logs: Monitor the compression process step-by-step and view results.
- Multi-Language Support: User interface available in Turkish, English, German, French, and Spanish.
- User-Friendly Interface: Modern and intuitive experience powered by CustomTkinter.
Screenshots
Installation
Prerequisites
To run PicPressor, you need to have Python 3.8 or a newer version installed on your system. You can download Python from the official website.
Cloning the Repository
To get a local copy of the code, use Git:
git clone https://github.com/alikarahisar/PicPressor.git
cd PicPressor
Installing Dependencies
After cloning the repository, you’ll need to install the necessary Python dependencies. Run the following command in the project’s root directory:
pip install -r requirements.txtThis command will install the customtkinter and Pillow libraries, which are essential for the application to run. Your requirements.txt file should look like this:
customtkinter
Pillow
External Tools (Optional)
PicPressor can integrate with external tools like OptiPNG (for PNG) and jpegtran (for JPEG) for more advanced compression options. While these tools can offer better compression ratios, their installation is entirely optional, and the application can perform basic compression using Pillow without them.
To install these tools, follow the steps according to your operating system:
- Windows:
- OptiPNG: Download the Windows build from the official OptiPNG website and add the
optipng.exefile to your system’sPATH. - jpegtran: Download
jpegtran.exefrom Libjpeg-turbo or Independent JPEG Group (IJG) packages and add it to your system’sPATH.- (Tip: Often, copying the
jpegtran.exeexecutable directly to a directory likeC:\WindowsorC:\Windows\System32can be a quick workaround without needing to manually add to PATH.)
- (Tip: Often, copying the
- OptiPNG: Download the Windows build from the official OptiPNG website and add the
- macOS:
brew install optipng jpeg - Linux (Debian/Ubuntu-based):
sudo apt-get update sudo apt-get install optipng libjpeg-turbo-progs(libjpeg-turbo-progsincludesjpegtran.)
Ensure these tools are correctly added to your system’s PATH, otherwise PicPressor will not be able to find them.
Usage
Running the Application
Once all dependencies are installed, you can start PicPressor by running the following command in the project’s root directory:
python main.pyCompression Steps
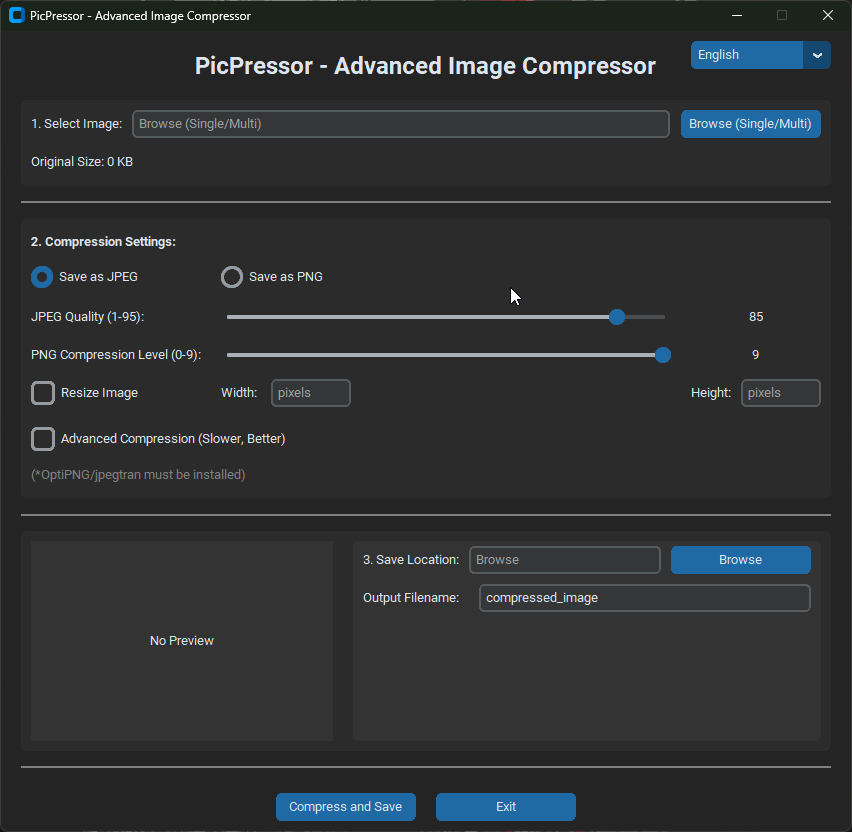
The application interface consists of three main sections:
- Image Selection:
- Click the “Browse (Single/Multi)” button to select one or more image files you wish to compress.
- If you select a single image, its original size and a preview (which updates based on your resizing and compression settings) will be displayed.
- Compression Settings:
- Save Format: Choose to save your image as JPEG or PNG.
- JPEG Quality: Adjust the JPEG quality using a slider (from 1 to 95). Lower numbers result in smaller file sizes, higher numbers in better quality.
- PNG Compression Level: Adjust the PNG compression level using a slider (from 0 to 9). Higher numbers mean better compression (but slower).
- Resize Image: Check this option to resize images to specific width and/or height values before compression. Enter width or height in pixels. If you enter only one value, the image will be resized proportionally.
- Advanced Compression: Check this box if you want to use OptiPNG (for PNG) or jpegtran (for JPEG) for potentially better compression ratios. Note that the respective external tools must be installed and added to your system’s PATH for this option to work. This option will disable the quality/compression level sliders as external tools use their own optimization methods.
- Save Format: Choose to save your image as JPEG or PNG.
- Save Location:
- Click the “Browse” button to select an output folder where your compressed images will be saved.
- Enter a base filename for the compressed image(s) in the “Output Filename:” field. If you’re compressing multiple images, the application will append an index and the original filename to create unique outputs (e.g.,
my_image_1_original_name.jpg).
- Compress and Save:
- Once you’ve configured your settings, click the “Compress and Save” button.
- The processing status and results will be displayed in the “Process Logs” textbox at the bottom.
- You will receive a success/error message upon completion.
- Exit:
- Click the “Exit” button to close the application.